Wednesday, 21 January 2015

Teaching Experience

Recently I've started trying to teach a friend some basics of photography to help her get to a point where she can take some nice pics in tricky situations, without her having to wait for the course she's booked next month. I don't think I'm being arrogant if I say that I know a lot about the technical side of photography and the theory of how to get stuff right. I don't claim to be brilliant at the artistic side by any means, but I've always been good at the details. I have, however, never really tried to teach anyone anything and that appears to be a whole different skill set. Here's some things that tripped me up when we met up and I tried to illustrate some concepts.

Time and Location


Including people
Looking for juxtapositions
Shutter speeds to freeze motion
We were somewhat constrained on time, and location choice was a convenience thing given that we both happened to be in or around Lancaster. Now if you have the timing right then the location probably won't matter so much, but we started way too late in the day, as the light was failing, in a very grey town (not grey in a bad way - there's just a lot of stone there), and it was raining. It's difficult to find suitably illustrative tricky lighting situations on a grey background (cameras love grey) in failing light, specially when you're trying to stay indoors so as not to get wet. We ended up doing some stuff about exposure lock and compensation using remnants of christmas lights in the shopping arcade, after a completely failed attempted demo of exposure compensation with some baubles, then we covered some stuff about metering modes using the brightly lit front of a frozen food retailer, then use of histograms by shooting across the street at the front of McDonalds, and finally we looked at flash exposure compensation using the crane thing that they'd brought in to take down said Christmas lights. We were limited to wide apertures, slow shutter speeds, or flash. 

In good light we could have done all those things much more effectively, and could also have looked at contre-jour and backlighting, dynamic ranges, HDR modes, limits of shutter speeds and apertures, use of more of the ISO range, freezing movement, panning, deliberate motion blur, and the list goes on. Alternatively in the absence of good sunlight, we could have planned (with some extra preparation) a different location such as a much larger shopping centre, open at night, more people, more depth, more shapes and colours etc.

Planning of Content


Hyperfocal focusing
Variations in aperture and depth of field
We chatted in Starbucks (other coffee shops are available) about what was causing confusion and I based what I'm laughingly going to call a syllabus on that. As such, it was somewhat improvised and I just went wherever was convenient rather than giving any chance of having a shot to remember. Almost everything I took that day was entirely forgettable. For example, demonstrating depth of field on racks of DVDs while surreptitiously lurking in a shop is undoubtedly a very visually obvious way to do so, but it doesn't give you shots that you want to show anyone. 

If I'd thought ahead as to where to go for different topics I could probably have built up a plan that would have left us with one or two memorable shots even in the failing light, and also been able to illustrate some of the concepts in question. If additionally I'd come prepared for weather (umbrellas etc) such that she could shoot while I talked, then we could have gone somewhere like Dalton Square which has street and building/bar lighting, statues, lead-in lines, people, cars etc, and some depth. The inside of shopping centres tend to be pretty flat. You're either looking at a wall, or along a wall.

Familiarity With Equipment


Tricky lighting
Dynamic range issues
I know my SLR inside out and can operate most of the controls without looking at them, with the camera to my eye, or in its rainproof jacket. If I press the wrong button (which I do sometimes) I know that straight away, and I can then move along and press the right one. Things like focus point selectors, exposure compensation, live view etc I don't even think about. My student is significantly less familiar with cameras in general, has only had her SLR for a short time, and it's not a brand I've ever used. As such, neither of us knew how to do even basic things like exposure lock, bracketing etc. 

Five minutes on the internet could have furnished me with a crib sheet of how to do the basic things I was likely to talk about, and would have saved us probably 30 minutes of lost light on shoot, looking for controls. I also found myself demonstrating things on my camera then expecting her to follow on hers. I think it would have been better if I'd mostly left mine alone. The problem there is that I was making sure I was right on the concepts even as I was trying to put them into words.

Planning the kit would also have been helpful. I arrived with my standard 17-85mm f/3.5-5.6 zoom lens. My student had a 50mm f/1.4 prime. Our lenses and thus the cameras attached to them therefore behaved somewhat differently.

If I'd foreseen that one, I could have primed my friend to bring along her zoom lens, as the aperture range would be similar to mine, and we'd both have wide angle capability to take the same sorts of shots.

Pacing


I've always talked too quickly. Anyone who knows me would likely include that in their "oh you know the one" description of me. ("Kev? Oh you know the one. Impossibly good looking. Tall, dark and handsome. Extremely charming. Talks REALLY quickly"). I've also never been particularly good at staying on one topic when talking. I get interested / engrossed and then my attention jumps around to whatever I think is most relevant to the point that's just been made or the question that's just been asked. 
Selective focusing
Depth of field
Use of flash
Whenever demonstrating one particular option or technique I imagine that it's best to stay on that until it's clear, even if the conversation leads in the direction of something else. As such I think I implanted as much confusion as understanding initially when it came to discussion of meter lock vs focus lock vs metering modes vs semi-automatic exposure modes vs exposure compensation vs focus and recompose. Again, if I'd planned the location / time / topic a little better then it might have been easier to stay on one topic for longer, but I think it would also need a conscious effort from me to shelve extraneous details that might confuse the main event until understanding of that main event reached its lightbulb moment, and it was safe to move on.

Conclusions


Selective focus
Checking the corners for distractions
Hyperfocal focusing
I want to have another crack at most of the topics I attempted to cover in Lancaster and I can tell that my friend is also keen to do so, given that some of the advice I gave appears to have confused matters rather than clarified them. Next time however we'll hopefully be able to discuss it a little more beforehand, plan a better time and/or location (plus the days will naturally be longer as we get closer to spring) and I can have a read up on her camera, or persuade her to buy a Canon.

Please Note


All of the images on this post were taken in Lancaster. None of them were taken on this particular trip, but the page looked so dull without any pictures at all that I thought I'd include some older ones from a visit in 2010. None of these are images I think are particularly special, but each situation or scene could have been used to teach one or more concepts. 

Maybe I just need to move somewhere sunnier.

Monday, 10 November 2014

Continued Non-Professional Development

Sunday 9th November was the date of Wilkinson Digital Splash 2014 in Preston, to which I went along, having enjoyed the seminar and presentation I attended last year. Having moved to a bigger better venue, this year the headline speaker was acclaimed landscape shooter Colin Prior. I booked onto his lecture/slideshow mainly because, having heard of him and knowing he was something of a famous name in photography in the UK (there aren't many household names in photography but Colin's probably among those closest to being able to claim that) I figured he would have some inspirational content and images, as was the case with Charlie Waite last year. Similar to last year though I also booked a seminar with someone less well known who was presenting something I'm interested in. Last year that was Lancashire and Cheshire wedding photographer Lisa Aldersley. This year it was Andrea Denniss, talking about the anatomy or the story of a portrait shoot, as it is in her world. I actually find these smaller sessions much more likely to drive my photography in a new direction than the bigger lectures, which is largely the point of this post. If you get chance it's worth listening to someone who does what you're already interested in, and the nature of these events is such that the speakers will tend to be pretty passionate, or they wouldn't be at the front of the room with their pictures on the screen in the first place.

Don't get me wrong,  Colin's lecture and slideshow was great. He talked about his various projects and showed some amazing shots. The only slight stress factor was the overrun - I booked Colin at 11am, and Andrea Denniss at 12:30pm, and assumed that there would be a 15-30 minute gap between the two where I could throw a couple of sandwiches down my neck before heading to the second venue, but at 12:29 when Colin was showing us all the books etc he has available at the moment, I finally decided I had to get to the other presentation (better to miss the sales-pitch end of one than the beginning of the other) and sneaked out as quietly as I could. Galloping across the UCLan Foster building campus I made it to the seminar room where Andrea was presenting, with mere seconds to spare, and squeezed in past all the earlier arrivers who were all sitting oddly close to the door, leaving the other side empty. Andrea started her presentation, then all the people who stayed with Colin to the end appeared and rather than similarly squeezing in, they all gathered chairs and stayed by the door, at which point the seminar proper began.

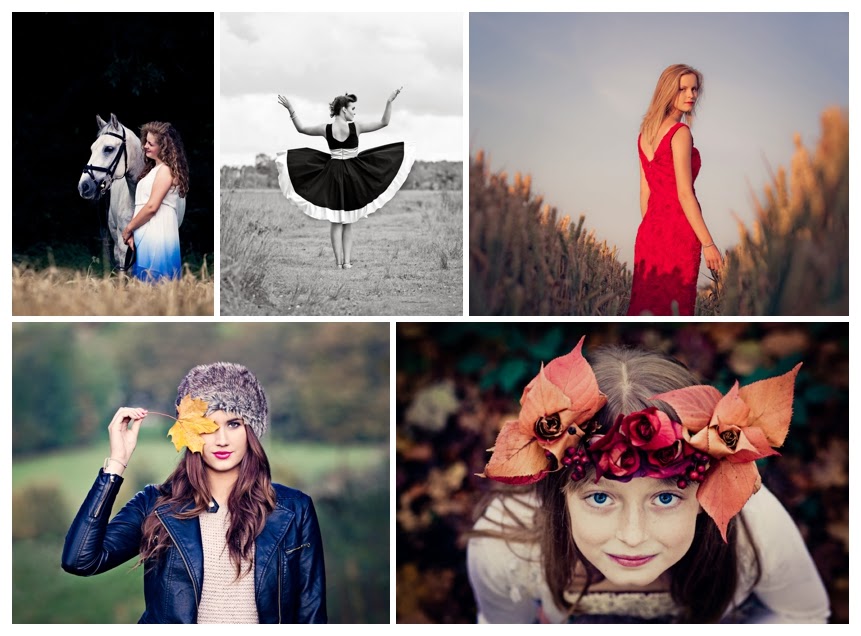
Andrea Denniss Images - All images copyright Pink Lily Photography
A selection of shots by Andrea Denniss of Pink Lily Photography

Now Andrea has a number of hats (in the figurative sense - she wasn't dressed like Danny Two-Hats from My Mad Fat Diary) being as she is a portrait and lifestyle photographer (she owns Pink Lily Photography) working to commission, and also a photography trainer for Aspire. I've included a montage of shots provided by Andrea above. (It's included at its original resolution to show it in its full glory, despite the odd shape that it leaves this post.) Andrea showed a slideshow of some of her work to give us a feel for the style, and then began to talk, and the thing that's immediately really obvious with Andrea other than her talent for creating beautiful portraits, is her passion for the craft and the business. For me this is the reason to attend these things - even if you're not necessarily into the style that someone does (not the case here - she had some lovely shots and I consider portraiture my favourite side of the hobby, though subjects are generally trickier to find, if not as hard to get to as the top of a mountain) listening to someone who really cares about it can make you care more about it too. It's left me wanting to shoot outdoor portraits in Autumn so I'm going to try (quickly...) to do that. It also got me thinking about training. I've wanted to learn how to pose group shots for ages and when Andrea decided to turn pro she took a number of training courses in photography. This lead on to talking about Aspire photography training for whom she works as a trainer, and the fact that they have a specific posing workshop day - exactly what I want. Accordingly, after the session Andrea tried to take me to meet the owner of Aspire photography training, Catherine Connor. Finding nobody in the room she gave me a card and said that Catherine was around the event somewhere so I headed back over to the trade stalls side to look for the Aspire stand, that I'd not seen earlier when wandering round unnecessarily spending money. (Hahnel Tuff-TTL Wireless TTL flash trigger and receiver - £90).

I found the Aspire stand and waited to chat to the lady manning the desk  (that sounds odd. A lady manning a stall - would she not be ladying it?) and handing out the leaflets etc. A short chat lead me to surmise (correctly) that this was the aforementioned Ms Connor and after taking my details and adding me to the mailing list, she mentioned in passing that she had another presentation in an hour. I'd intended to hang around until after the Andrea Denniss seminar which I had assumed would end at 13:30 but it actually continued unnoticed (time flies...) until around 14:00. This was followed by a chat between Andrea, another delegate and myself for another 20 minutes or so, then Andrea and I went to find Catherine and failed. As such I was already at the event much later than planned, so returning to reception I bought one of the last two tickets for Catherine's talk, which I assumed was about training but was actually about making the step from amateur to professional. Not being in this bracket you'd think this was of little use to someone such as myself, but again someone who really cares about their topic is usually interesting to listen to, and Catherine is definitely one of these.

I came away from this seminar full of ideas and inspiration to improve this blog, publicise my flickr, maybe even join Pinterest. I have no plans to go pro, but I do like it when people know what I do and what I'm good at, and I love doing shoots with people. I've not done one for a while so I definitely feel somewhat out of practice at people shots. In the past I've done a couple of individual shoots and one or two mini shoots (just a few shots for whatever purpose) plus two pretty planned 'group' shoots (each of which only included two people) and one family shoot in a park, and where I always feel that I fall down is in arranging them to look comfortable and interesting. As such I was very happy to receive two emails today from Aspire, one inviting me to an open day which I definitely plan to attend if I can, and one specifically addressing my interests as recorded yesterday, and describing the posing workshop course next February, which is partially taught by Andrea Denniss.

If I go on the posing workshop as I intend to, and I enjoy it as I expect to, I can already see that photography training might become (another) expensive new pastime. I suppose it's cheaper than track days and pilot lessons...

I seem to have strayed from the point slightly, which is that in my opinion, when you're looking for ideas or inspiration, one of the best places is to get it directly from those who already do what you want to do. If you get chance to attend events like this and you haven't been to them before I'd highly recommend them.

I was going to liberally scatter images through this post but as it's all about other people's photography I thought my own shots wouldn't really make sense, so apologies that it's somewhat text heavy. I'll see whether I can find something appropriate and add it.

-------
Try to learn something about everything and everything about something. Thomas Huxley

Tuesday, 5 August 2014

How Deep is your Field?

Pictures to be added to this one later. Published as is for proofreading purposes.


During a conversation at work today, we were discussing how people are all seemingly buying DSLRs at the moment, whether they're actually interested in photography or not. In the ensuing chat we were talking about what are the biggest advantages of a DSLR over a digi compact, and then we moved onto more general photography related matters, including about what difference it makes where you focus in a picture when taking it - whether it makes any difference whether you focus on whatever's in the centre, your main subject, what's behind it, etc. It got me thinking that there's probably a whole collection of people out there whose photography has always been very much point and shoot with, most likely, a phone.

Now phones have come on a long way since the first camera phones came out. My first camera phone was a Nokia 6100 with a clip on camera on a wire. There was no viewfinder, the screen was tiny, the resolution abysmal (640x480 I think), but at the time I was working in an office where cameras were banned, so it worked for me as I could leave the camera part at home. Modern phone cameras are a world apart from these early beginnings. My phone, which is by no means the current state of the art, shoots pictures which have 13 megapixel resolution. It has adjustable white balance, ISO, flash control, scene modes, sweep panoramas and 1080p video. It's really pretty good, and much better on image quality than some older digital compacts, but it does have one really limiting factor in common with pretty much all phones and most low and middle end digital compacts - a tiny sensor. This makes a difference to quality in that there have to be more photosites (sensor elements) crammed into a tiny space, so they have to be smaller and therefore pick up less light and have to be amplified more, but that's not my concern with this post. My concern is the fact that with a tiny sensor you need a tiny length of lens and with a tiny short lens you cannot achieve shallow depth of field.

Depth of Field Defined

I've touched on depth of field before - one of my earliest posts on this blog (Not the length of the grass) was a mini discussion of the concept, but I re-read that today and noticed it's not exactly in-depth, if you'll excuse the pun. I'll attempt to rectify that here.

You can imagine depth of field as two points on a line extending straight out in front of you from the camera. Between those two points is the actual single "plane of focus" - you are after all focused on only one point in the image so the only completely sharp parts of the image will be things on the same subject distance plane as the subject itself. Anything in the "sharp zone" between these two points will appear "acceptably sharp" on the sensor and in any resultant image file. As you go outside of these two points the image will appear softer or more blurred, with the effect increasing as you get further away from the actual focussed point, whether that is towards the camera or away from it. There are various things you can do that will move the points on this line, and various features of the camera and lens that will limit the effect you can have. Listing the things you CAN change first:

You can change the aperture on the lens. This is the big advantage of a middle or high end compact or a DSLR over a low end compact (or pretty much any film compact other than a few specialist exceptions). Aperture has been discussed before in this blog, but is basically the diameter of the hole in the lens through which the light is able to pass. Making that hole larger by making the aperture number smaller (f/5.6 --> f/4 --> f/2.8 for example) will move the two points defining the sharp zone closer together, and reduce the amount that's sharp. Making it smaller by making the aperture number larger (also known as "Stopping Down" - f/5.8 --> f/8 --> f/11 for example) will move the two points further apart and increase what's sharp in the image.

You can change the length of the lens by zooming in or out, or by physically changing lens. A shorter lens will cause the points to move further apart, and provide more depth of field at a given subject distance. Of course it will also change the perspective of the shot so you'll then need to move and recompose to get a similar subject distance. A longer lens will move the points closer together and reduce depth of field, making less of the scene sharp in the image.

You can change your distance to the subject. The further away you stand, the further apart those sharp-zone points get, and the closer you get to the subject, the smaller the sharp zone becomes. It's actually not as simple as this when changing multiple variables simultaneously as explained here but for the purposes of this exercise it can be considered to be a truth for the moment.

The limiting factor that you can't do anything about other than change camera (unless you have a roll-film camera with different film masks available, or an XPan, or a sheet film camera - but that's one for the pedants...) is the size of the recording medium. This may be a sensor of one of myriad different sizes, or it may be film. For the purposes of this it makes no difference which it is - it's only the size that matters. It's not so much that a small sensor actually directly affects the depth of field - it's more about the lenses required for that sensor.

Short Lenses

For a given sensor size there is one particular length of lens that gives a 'normal' perspective, and wide angle or telephoto lenses are either side of that length. Going back to my own phone, according to Geekaphone it has a 4mm, f/2.4 lens and a 4.8mm x 3.6mm sensor. When you start up the camera it's set to a slight wide-angle (around 30mm equivalent on a 35mm format sensor or film) and assuming we ignore the fact that digital zooms are useless, the digital zoom can be used to get to 'standard', so we can assume probably that the "standard" lens for this sensor size would be around 6mm. We've said that a shorter lens causes larger depth of field. Now assuming we had this camera/phone with a 6mm fixed lens on it, the field of view (how much is in the shot) would be normal for this tiny sensor, but if you pointed it at a 35mm size sensor, this would be an ultra-wideangle lens. With such a short lens the depth of field would be enormous, and remains enormous even on this tiny sensor. As such, it's very difficult to achieve shallow depth of field (sharp zone points close together) on such tiny sensors, so you have to go to extremes on the other variables to overcome this - physically close in on the subject and use the widest aperture available - and you'll still be at a disadvantage over something with a larger sensor.

Long Lenses

We said that long lenses reduce depth of field, so again let's consider the phone camera. A telephoto lens might be, say, four times the length of a "standard" lens. On a 35mm format camera a standard is 50mm and a 200mm is very much a telephoto. On the phone, if 6mm is standard, then 24mm would be telephoto. This is a wide-angle lens on 35mm format and will still have very limited depth of field. A 200mm lens attached to the same sensor would be the equivalent of a 33x zoom, giving us an equivalent focal length of over 1500mm. This is exceptionally long, and would have the same depth of field as this relatively modest telephoto would on 35mm.

It should be added at this point that all a digital zoom on a camera or phone does is crop in on the centre of the image and interpolate enough pixels to make the image up to full size. As such, it does not affect sharpness / depth of field in any true optical way, but as the image is magnified, any loss of sharpness becomes more obvious. I've not tested it side by side with a real optical zoom or long lens but I suspect the effect will be similar.

Other Sensor Sizes

Working upwards from the phone sensor, many digital compact camera sensors will also be very small so we'd need to step into the mid-range to get a worthwhile increase. There are numerous sensor size charts on the net - for example this one. The phone was a 1/3" sensor. Canon Powershot G cameras (other than the G1X), Nikon 1, etc go slightly larger, then you get into the micro four-thirds popular in Olympus and Panasonic cameras, then to the APS-C found in most DSLRs and many compact system cameras, up to "full-frame" 35mm equivalent, and on above that into medium and large format film and digital backs. The same lens used on any sensor size with the same subject distance, cropped to give the same angle of view will always give the same depth of field, but if you physically move the camera to compensate then depth of field will be affected. This rather excellent depth of field calculator lets you play with the various parameters.

Take our standard 50mm lens on a full frame 35mm SLR. At f/2 (pretty wide open) and the lens focused at 40 metres we have apparent sharpness from 20metres to infinity. If we take that lens and put it on a 6x7cm camera such as the Mamiya RB67 which has around four times the sensor size, we end up with a wide-angle lens. In order to take the same photo, the photographer needs to move much closer to the subject (one quarter of the distance), which will reduce the depth of field available. My maths might be wrong here (it's late at night) but assuming the photographer moves to 10m from the subject to make it the same size in the frame, and keeps all other variables the same, the depth of field reduces to only 15 metres - between 6.5 and 22 metres, so anything more than 12 metres behind the subject will appear blurred. This means that it's much much easier to achieve shallow depth of field as the sensor gets larger. This could also be taken as being harder to maintain a large depth of field, which is why lenses for large format cameras often go to smaller apertures than those on smaller formats, with f/64 being a commonly available small aperture on 5x4 inch cameras.

Back to the point

So we have our advantage for larger sensor cameras - depth of field is more controllable for a given length of lens - as well as a somewhat circuitous explanation of why it matters where you focus. There's one more point to consider that aspiring serious photographers should be aware of and that's the concept of hyperfocal distances. When you focus on a given point and choose your aperture to set the depth of field, one third of that "acceptably sharp" section is in front of the focused point (towards the camera) and two thirds are behind it. This allows you to maximise your depth of field by choosing where in the frame to focus. If you focus on infinity when shooting a landscape, you throw away two thirds of your depth of field beyond infinity (Buzz Lightyear kept labouring this point). If you can't see infinity and you're shooting at an actual plane (the front of a building) then focusing on the building itself puts two thirds of the depth of field inside or behind the building where you can't use it. If instead you focus in front of infinity or in front of the building, you should be able to keep more of the foreground in focus while not losing the sharpness of the infinity / building point. Some lenses (mostly older ones) have depth of field marks on the focus scale which allow you to pre-calculate this and pre-focus the lens. Without this you're basically reliant on guesswork/experimentation, on clever Canon-specific modes (DEP and A-DEP both use hyperfocal focussing) or on using the Depth of Field Preview function on your camera.

Depth of Field Preview

Found on most SLRs, this is usually a button but sometimes a lever, usually on or close to the lens mount. When you press it the lens is stopped down to the taking aperture and the image will (assuming you're not set wide open) darken. In this darker image it's possible to see the extent of the image that will be acceptably sharp. With enough dexterity it's possible to adjust the aperture and the focus distance while holding this button down, and watch the changes as they happen. Try it next time you have a camera and a few spare minutes. Manually focus on something distant, set f/8 as the aperture, and hold down the depth of field preview button. Now adjust the focus towards the camera. The item in the distance shouldn't start to go blurry until the focus point is quite a long way back towards the camera, but things in the foreground should start to get sharper as soon as you move the focus. It's a win-win for shots where you have the time.

DEP and A-DEP

Your remaining depth-of-field control options if you have a Canon DSLR are these two modes. DEP allows you to individually focus on two scene elements. The camera will work out the optimal aperture and focus distance to get both elements sharp, allow you to recompose, and take the shot. A-DEP is a simpler beast where you have to put both of your subject elements beneath focus points at the same time, but otherwise the logic is the same. In both modes, the camera will choose aperture and shutter speed to give you AT LEAST enough depth of field, if possible. It may, depending on lighting conditions, give you more. I don't think it's designed to allow you to deliberately get a shallow depth of field in bright conditions.

Thursday, 8 May 2014

A Little Healthy Competition

I mentioned in the last post that a few of the members of the camera club had entered some images into the Lancashire and Cheshire Photographic Union Individual Competition. This is an annual event and one of the two main competitions held by this body each year. As well as this one there is the club competition where the club selects and enters images from among its membership. 

The individual contest is different in that each and every member of an affiliated club is allowed to enter up to 24 of their own images, under the banner of their club, but not as a representative of it directly. Best of all there’s no entry fee additional to your membership of your respective club. So often these days, photography competitions come with a price tag just to put your pictures in, sometimes per picture.

There are three categories in each of two classes. Open colour can be anything in colour, whether photoshopped or not and in fact whether even obviously a photograph or not. Open mono is the same in… well… monochrome, which can include toned images as long as they’re single tone and not a toned black and white. Nature gets its own category and images must be very minimally processed - no major cloning etc. Within each of those categories, entrants can put up to four prints and up to four digital projected images. As this was my first time I dipped my toes into only the areas in which I felt comfortable. Three images in Open Colour, two in Open Mono and one in Nature, all as digital images. I don’t think that most of them will do particularly well, so all I’m hoping for is to not get bottom marks (6 points) for any of them, and to do better than adequate (10 or more) for at least one. 


I’ve put all my entries onto the bottom of this post. It’s being judged on Saturday 10th May and we should hear back as soon as our competitions secretary takes a break from the Eurovision build-up to check it.

The World is Waiting was taken when we went to the Paralympics in 2012. It was early in the morning and the park was fairly quiet compared to how it would get later. There was a little viewpoint to the side of the main walkway that provided this beautiful angle over the main stadium. Sadly we didn't get to go into the stadium itself, but we did see a couple of the other venues.

At the Start Line was taken at a motocross event somewhere in Lancashire - either Garstang, Whalley or just possibly Charnock Richard. Bike 464 is a former colleague (One Matthew Turner) who I'd gone along to support / shoot. This was the scene as the 20 or so bikes left the line simultaneously on full revs. Motocross at a well chosen track is a brilliant route to low cost close up motorsport photography, and being very much an amateur sport there are no subsequent restrictions on what you do with the shots you take.

Timing is Everything was taken at Southport Air Show 2013. The Red Arrows are pretty much one of my favourite things, and I reckon being a pilot with them has to be the best job in the world.

Black Country Afternoon was taken a few years back when visiting a friend in Birmingham. I grabbed this shot on a compact as we were about to leave the Black Country Museum. I have it on my wall at home in sepia tone. I like it because at a glance you can't tell whether it was taken in 2009 or 1949.

Komodo Dragon is my sole foray into the Nature category. This shot was taken at Chester Zoo. I like it because the animal looks friendly to me, like he's posing for the camera. I think the judges will dislike it for the same reason. There's no movement, no action, and this is probably my leading contender for bottom marks in this very competitive category.

Barren was taken during the sail away from Helsinki during a cruise of Northern Europe. I had no idea until I went there that Helsinki Harbour is guarded by a complex archipelago of small islands, some of them with buildings and structures on like this one, some bland and featureless, and some with small complexes and people clearly living or working on them. It was a slow departure and I took dozens of shots, of which this is one of my favourites.

The World is Waiting

At The Start Line

Timing is Everything

Black Country Afternoon

Komodo Dragon

Barren

Thursday, 1 May 2014

Clubbing, or Camera-derie...

I've always thought it would be good to join a camera club or photography society as some of them are known, but like many people I've been put off by talk of obsession with distinctions (LRPS etc) and competitions, snobbery, and most of all by the times of the meetings. I work reasonably long hours and I'm not always able to commit to getting out of work on time to get to an early evening start, so I've never got around to joining or even visiting one and my photography was largely a solitary pursuit or something done with the indulgence of my lovely wife on days out and holidays etc.
Around six months ago I heard about a local camera club from a fellow member in the woodcraft club I also frequent. This one was different by the sound of it, as it was quite a young club so no long history to live up to, most of the members were relatively inexperienced in photography as a medium or as an art, it was just around the corner from me, and best of all, meetings started at 7:30 or 8:00 pm so I could get to them easily. So it was that before long I found myself a member of Roby Mill Community Camera Club.

The club meets in The Star at Roby Mill every other week. They're unlike most other clubs I've heard about due to their active programme during the summer months - they like to be out and about taking photos whenever possible. It's very much about going out together and taking shots, and much less about homework and critique, though there is still obviously a level of critique, as you would expect. In winter they are more confined by the conditions but there's still a lot of actual camera activity. 
One of the nights earlier this year was a fifteen minute challenge where we all piled into cars, went to a less than obvious location and took the best picture we could in fifteen minutes, then returned to the pub to look at each other's best pictures. We've also spent time in a cemetery car park taking photos of a man dressed as a Jedi and waving a lightsaber, had a presentation on using Lightroom and Photoshop for post production, had a talk from an L&CPU judge (Lancashire and Cheshire Photographic Union) about what it takes to enter competitions, and as a result a few of us have entered some pics into the annual LCPU Individual competition, entry for which requires you to be a member of an affiliated club.
Overall impact of the club has been huge on my photography. I've taken lots of pictures that I wouldn't have had the chance to capture, used my tripod more times in the last three months than the whole preceding three years, talked to more people about photography technique and compared images with more interested parties than for a long time. And I like to think I've helped a few people to learn something as well, just as they have for me. 

Tuesday, 9 July 2013

Prints, prints and more prints

In the mail today I received a packet about an inch thick, and a tube about 40 cm long. Contained within were 380 (theoretically - I haven't counted) 6x4 prints and one A3 "poster" print. All but one of which were from my recent holiday. Why so many you ask? Well.

I remember when I used to shoot a lot of film that I always bemoaned the fact that a digital process encouraged the taking of thousands of pictures but the printing of none. In order to prevent the same phenomenon overtaking me, I invested in a decent photo printer within a couple of weeks of getting my first digital camera, and for a while the two were technological soulmates; any time I took a lot of pictures at least a couple would be printed in spectacular glossy colour on expensive A4 paper. I then moved house a couple of times, my life moved on in many ways and I found myself among those people with a huge archive of digital files but very few actual recent prints. I then discovered Photobox.

If I remember correctly I first discovered Photobox when looking for a route via which to print something larger than my printer could cope with. I don't think I went straight in with the 40x30 inch giant print, but that may have been my second or third order once I was confident of the quality. Since then it's mainly been when printing large volumes of shots that I've turned to they of the green splat logo. After my wedding and honeymoon I sent them about 500 shots and within a day they were printed and dispatched. There's something really exciting even now about waiting for your prints to arrive. Even though there's no longer the wondering what you're going to get, it's still nice to have some physical prints to flip through, maybe put one on your desk and a few on the wall. The A3 one is destined for framing if only I can find a wall with space for it.

As to why so many, I'm going to have to go with why not? I took 1500 shots on holiday of some amazing places and great experiences. I flicked through those and those 380 called out to me. At those volumes prints cost about 7p each, so my 380 + 1 cost me £38, and I should have plenty of options should I wish to fill an album.

If you're fed up of looking at photos on your phone or iPad, perhaps it's time to go back to a simpler time just for a few days , order some prints, and fill an album. Just maybe your grandchildren will thank you for it.

Monday, 1 July 2013

Mini Hint #281 - Protection Filters

With any interchangeable lens camera your first accessory purchase should be a protective filter for the lens. These are optically neutral (or close enough) and are mainly there as a sacrificial surface to take the scratches that you really don't want on the front element of your lens. Look for a Hoya multi-coated (HMC) UV filter (colourless and will supposedly cut down on atmospheric haze) or Skylight filter (slightly pink to reduce the blue effect of distant scenery), put it on your lens, and leave it there until you either break it, or inevitably get dust behind it and have to remove it to clean it.

Some people will say that every extra layer of glass reduces the optical quality. This is technically true, and I certainly wouldn't put a £5* filter on a £400 lens, but unless you're a professional and can afford to take the risk (in which case you wouldn't be reading this) then adding a decent bit of Hoya glass between lens and subject isn't materially going to hurt anyone.

* prices of filters depend on quality and thread diameter. Some tiny filters for lenses on things like the Nikon 1 or similar may actually cost only £10-15 or so so be led by brand in that case. Hoya HMC beats Hoya, which beats Hama. Cokin screw-in filters are probably somewhere in the upper middle range. It's rare for me to see anything that's not one of those four, but Canon etc do also make their own filters. I only have one of those :-)

Saturday, 29 June 2013

Night Fever

One thing that often stumps people as they get into taking pictures on a more serious level is how to deal with low light or night photography. They point their medium to high end compact at a beautiful scene, press the shutter, and are immediately disappointed with the results.This is because most compacts in auto mode don't support or at least won't choose long shutter speeds. Those that do support longer speeds often only allow them to be used in the 'semi automatic' or manual modes. If you turn on Auto ISO (The Devil) then problems are further compounded as the camera will crank up the sensitivity in order to get you a hand-holdable speed. Of course in this case we're not expecting a hand-holdable speed. Consider the attached shot.


This was shot at ISO 800, 1.6 seconds at f/4, on a 20mm lens. I've adjusted levels and done some slight sharpening in Photoshop 6.0 to get the best out of the medium JPEG because I didn't have the tools to hand to process the RAW file. Local time was around 11pm and the light was fading as we approached this bridge which connects the island containing Copenhagen with mainland Denmark. In a one-chance situation like this it's important to plan what you want to get and how to get it before the 'decisive moment' (as Henri Cartier Bresson would describe it) arrives and then is left in your wake, mocking you about having missed the shot. In my case I took a number of test shots before this, and came prepared with one of my favourite photographic accessories, the Pod, SLR edition. This is a squat cylindrical beanbag with a tripod thread at one side. It's perfect for propping the camera on a rail or similar and letting go for a second or two, when a proper tripod is either too bulky or just not available. What I normally do is set the camera on self timer with a short delay (2 seconds on my SLR) unless I have a remote release to hand, prop it in place, push the shutter, then let go entirely, hovering my hands around the camera until the shutter opens and closes. This allows me much more freedom to use longer speeds than would otherwise be possible. 

In terms of hand-holdable speeds the rule of thumb has always been the reciprocal of the focal length (i.e. for a 20mm lens, 1/20sec). Modern cameras and lenses often include stabilisation which allows a couple of stops of leeway on that, so maybe 1/4 of a second or so. At that speed, given that my lens aperture was wide open I would have had to increase the ISO by three stops, to ISO 6400. Even if my camera supported that the quality would have been awful. Hence the pod. 

I was therefore limited only by the 'environmental' features inherent in this shot - namely the motion of the ship and the crush of people around me. I therefore settled on a compromise of 1.6 seconds, boosted the ISO to 800, and let the aperture stay fully open, as the depth of field would be sufficient given the wide angle lens and the subject distance. More than 1.6 seconds caused visible movement in the bridge itself, and less would have required the use of ISO 1600, which was further than I wanted to push it.

In term of the remaining technicalities then, the camera was on evaluative metering which did a pretty good job with exposure (albeit a bit flat). This is what I'd recommend you try first if you have options. You may find that the whole scene turns out a little too light and lacking in contrast, in which case you can dial in a stop or two of exposure compensation to bring it down. Again, keep taking test shots until you're basically happy with the appearance and then you can concentrate on composition.

Many compact cameras will only go to these longer speeds if given no other choice so if you find your pictures being very dark and your shutter speeds hovering around the 1 second mark, try shutter priority if you have it and see whether you can force the speeds to go long.


Monday, 24 June 2013

Locational Inspiration

I've recently been lucky enough to have a lovely holiday round northern Europe and having not taken a lot of shots recently it was like a smorgasbord of inspiration. I couldn't decide what to shoot and what not to but of course as we're firmly in the digital age I didn't have to make that decision and shot everything. It's opportunities like this though where I think I learn most about this craft. Take the attached pic of Rostock's main square. I took about six variants of this one with different composition, different apertures etc. Happily the exposure was simple. Other places I bracketed exposures due to tricky lighting, messed with white balance to get beige ceilings the right colour, and generally did lots of things that in a more normal or more structured environment I either wouldn't have time to or wouldn't need to consider.

Of course I also shot raw files so if I do get that white balance decision wrong I can sort it out later. Belt and braces and all that.

The Rostock pic is also an example of the balance rules I talked about earlier. The horizon is pretty much on the upper third, the foreground is given plenty of weight of repetitive detail to balance it with the intricate details in the background, which has been maintained by using a small aperture. In the wide aperture variants too much is lost at the back. I have a load of my favourite shots from the holiday on Facebook (totally unprocessed jpegs straight from the camera) and while most are just record shots, there are a few arty ones on there I think - if you have me on your Facebook see if you can spot where I've used the rules and where I've broken them, and I'll post more soon.

Happy shooting :-)

Friday, 25 November 2011

Mini Hint #117 - Auto ISO and the Devil

To clarify. Auto ISO *IS* the devil. If you want high quality shots, turn it off and forget you ever saw it. Your camera doesn't care if you get noise in your shadow areas. It has no vested interest in the quality of your pictures. It's trying to help you get acceptably sharp pictures by speeding things up, but remember - You are its master - take charge and tell it to use ISO 100, unless you consider the conditions and decide otherwise. Or you're drunk.

Thursday, 24 November 2011

Compositional Rules

In any pastime or activity there are people who will tell you that there are certain rules that you must not break. Photography is something of an exception in that you will rarely be introduced to the 'rules' such as they are, without also being told that they are there to be broken. What you will also be told however, is that to break them effectively, you must first understand them. In this section I will introduce one such rule. It's the most well known of the compositional rules and it is usually referred to as 'The rule of thirds'.

Before we get into that though I think it important to mention balance. This is the balance of an image and its composition rather than that of the photographer, who may be extremely lopsided with no negative impact on their pictures... Sometimes you will see an image that feels awkward, lopsided, or weighted too heavily towards one side, or the top or bottom of the frame. Often in images seen in magazines or online portfolios, this is a deliberate choice by the photographer to induce a sense of unease in the viewer, usually considered appropriate to the subject matter. There will often be a story associated with the image, which the feeling of awkwardness somehow enhances. Conversely though, many photographs seen in magazines and particularly on posters will feel very relaxing as your eye wanders over them; as of everything is in its right place and the whole thing feels balanced. Left and right are given equal precedence whether that be subject points, large background elements, or similar levels of nothing. The foreground and the background (usually frame bottom and top, respectively) each have something to offer, whether that is interest or space. This is compositional balance, and is what many photographers strive toward, much of the time.

And so to the rule. If you take a typical scene with a main subject, some background interest, maybe some empty space, and imagine you're looking at it through a 3x3 grid, like a noughts and crosses (tic tac toe) board. The image is split equally into nine squares or rectangles. The rule of thirds asserts that if you place your main subject on one of the four intersection points, and any horizon or other horizontal dividing lines across either the top or bottom third, you will likely end up with a more balanced and interesting photograph than if you point your central focus point directly at the main subject and fire the shutter. Go back to those landscapes on the net or in magazines or on posters. Many of them you will see follow or almost-follow this rule, and the ones that don't are not even close, like they set out to deliberately go against it. Even those where the subject is central or symmetrical horizontally will often have a horizon or other dividing line on the upper or lower third boundary.

As I said, the rule is meant to be broken but first (grasshopper) you must understand what you are breaking and why. Take the rule of thirds with you on your next landscape photography trip, or next time you visit a stately home or monument, and see how different your photos turn out from those you took before. Sometime soon I'll return to 'the rules' and discuss how and when to go about breaking them.

Wednesday, 3 August 2011

Infrared Pics


It was sunny on my way home tonight so I stopped close to work and took some test shots with the Canon Powershot G5 and my Cokin P009 infrared filter. Here are the results after some basic photoshopping. I won't win any awards for composition or subject but I'm happy with the result of the test. :)

Tuesday, 2 August 2011

By the way...

The pictures from the stately home on the roll of Velvia from the Halina TLR came out really well. There's something about a well focussed and exposed 6x6cm slide that blows pretty much everything else out of the water. No matter how big the print, a 6x6 Velvia on a lightbox will always grab the eye for me.

Wow long time no write

Well it's been a LONG time since the last post. Over a year in fact. During that time I have done photos at weddings, photos on holiday, photos of airshows, but only in the last couple of weeks have I actually done any creative photography, and for that I have some old technology to thank. Film. I'd started a return to film for some of my photography - mostly high speed black and white stuff like the lovely Ilford Delta 3200 - a few months back, when I spotted a good condition EOS 3 on one of the used equipment sites (probably Ffordes though it may have been Mifsuds) and decided to treat myself to what was my absolute dream camera all through the latter part of the 90s. I've not been disappointed and it's a beautiful piece of kit, but that's for another day. I then ended up at Jessops in the Trafford centre buying film to put in it. £60 later I was the proud owner of 5 rolls of Kodak Portra, a couple of Sensia process paid slide films, a Velvia, a Delta 3200, and a couple of rolls of 120 Velvia and Provia to put through my Halina TLR. Most of it is still in the fridge if I'm honest (which is more than I could say of Jessops, where film has been consigned to a wooden drawer full of a hotch potch collection of plastic bags and multipacks beneath the counter), but I have been through a few films lately.

Like many people I suspect, I've had a few rolls of exposed film kicking around in the bottom of a bag for a while, and some still sat in the last camera I used them in, partly exposed and abandoned. Some of them dated from at least five or six years ago, some black and white, some colour slide, one infrared black and white that I was sure had been spoiled by the way I changed the film in shade instead of complete darkness, not fully understanding the process of how to use it at the time. I checked around for a place that still understood infrared film (not quite trusting Tesco or Jessops...) and found Metro Imaging in London, where the very helpful Tony reassured me that he knew exactly what needed to be done, but warned that really, it did need to have been handled in complete darkness. Hedging my bets I elected process and same-size contact sheet and didn't expect much from it, so imagine my surprise when it turned up and pretty much every frame had come out, some complete with the trademark white leaves and black skies of infrared photography.

Inspired by the unexpected success I have since bought some more infrared film (the choice is much more limited these days) by a company called 'Efke', then discovered that in order to shoot it I needed a proper infrared filter instead of just a red like the Kodak stuff of the past, so I've also bought one of those. Next I discovered that I could do the same thing on my DSLR (to an extent) and on my compact so the next accessory was a lens adapter for my Canon G5 to allow me to fit the IR filter to that, and hopefully get instant results. Finally at lunchtime today I got chance to take out the oldest of all my SLRs - my dad's old Pentax ME with a broken shutter button - and shot 15 shots (tripod mounted, remote release, f/16, exposures ranging from 0.5 to 8 seconds) of a power station across a field containing horses. In my imagination, the power station looks dark and foreboding, the grass is white, the dry grass in the adjoining field probably darker, the sky a light grey flecked with streaks of jet black, and the horses look ... perfectly normal. Hint - when shooting infrared, seek out animals in some of your shots. Cows for example are a stereotypical IR subject, as they look entirely unchanged and unconcerned about the white foliage they're chewing on.

So the lesson for me from this whole thing. If you're low on inspiration, go old skool, dig out those unprocessed films from your past, and get them sent off.

Oh, and if you put film in your camera, finish it and get it processed, or even just finish it, wind it back, and keep it somewhere cool and dark. Of all the films I've had processed, the only ones that really showed any image quality problems at all were the ones I left part-used for years. In those ones, the old frames, left wrapped around the take-up spool for years, had faded and lost most of their interest. By contrast (scuse the pun) the ones that were older than these, same film type, but left would back into their casings, in their plastic tubs, in a darkened bag in the wardrobe, came out pretty much fine.

Saturday, 5 June 2010

Struggling for Inspiration

I often find that while I may WANT to take pictures, I have no idea what to take shots of, and nothing I can think of inspires me to create in my mind. Sometimes this malaise is broken by a family event such as a wedding or day out with friends, or trip to the zoo (guaranteed to get me filling CF cards) but other times there's nothing of note going on and I have to just work through it.

It's at these times that I take a step back and remember what got me taking photos in the first place. As well as the need or desire to create and record, I've always (well, since my teens) had an interest in the techniques, details and history of photography. A trip to a photo exhibition or gallery, or something like the photography, film and tv museum at Bradford can plant seeds of things I want to try. My favourite ever photo is 'Birth of the Ark Royal' by E.Chambre Hardman of Liverpool, and the National Trust have relatively recently opened up his former studio, preserved as it was throughout the latter part of the 20th century, to visitors at 59 Rodney Street, Liverpool. That's on my list for the next time I hit a dry spell.

Most recently though I went back to my roots and shot some film. I always find it refreshing to only have a few handfuls of frames rather that the machine gun of a modern DSLR. It makes you consider what's in and what's out of frame, as cropping is more difficult; it makes you think about exposure and not just shoot & adjust as you can with a preview screen. My most extreme recent example is taking my £9 eBay Halina TLR out for a day at a stately home, with a part-used roll of 120 velvia 50ASA, giving me about 8 exposures to use. no built-in meter meant using my £4 handheld lightmeter to get exposure right on the fairly unforgiving film. Focuses the mind beautifully. I only took about five shots in the end, but as I always used to be when shooting film, I'll be excited to get them back and see how I did.

Sunday, 29 November 2009

Shedding some light on the subject

You may or may not know that the word photography means basically light-drawing or drawing with light. As such, light is the most important thing to consider when taking any photo. That sounds serious, but think about it - too much or too little light for your camera and you can't take the picture at all. I'm not so much talking about quantity of light in this entry however, as much as type, quality and direction of light.

The first choice to make is whether to shoot indoors or outdoors. Unless it's night time, outdoors is usually brighter than a lit indoors area. This means that working without flash or extra lights is often easier outside, with faster shutter speeds available and hence less chance of camera shake or subject movement. If it's very bright outside though, it can mean you're limited in terms of slow shutter speeds and wide apertures, so if you're shooting something you can pick up and move, especially if it's a still life type object, taking it inside sometimes affords you more freedom to shoot how you wish. Inside lighting options include flash, desk lamps, windows, torches and normal room lights among others. If on the other hand you're shooting something fast moving like children, moving outside will allow you more likelihood of being able to catch a sharp image.

When you shoot in relatively dim conditions without flash or extra photo-specific artificial lights it's often referred to as 'available light' photography. This can be done indoors using windows or the light spilling from another room, or outdoors using street lights, light from a window, or even passing headlights if you're particularly careful about where you set up. The point is using 'borrowed' light - whatever light is already available in a location is what you have to work with, without adding more of your own. Available light photography techniques are often used for portrait and glamour shots, where the subject is lit by light spilling through a blind or from a window a little way away. There's also nothing to say you can't reshape or redirect the light using diffusers and reflectors to fill shadows or deepen them, or reduce harsh direct light. a very useful purchase I made some time ago is a lastolite 5-in-1 reflector which provides, as its name suggests, five light changing options. A diffuser for softening light, white, silver and gold reflectors for filling shadows and adjusting the tone of light, and the intriguing black reflector which effectively takes light away. The black side essentially replaces any reflective surface which is pushing light back onto the subject, with a non-reflective one which may, depending on scene arrangement, itself reflect on the model or subject's surface or skin.

As I said at the top, the first choice is indoors or outdoors, and the best thing about the outdoor option is the range of lighting options it provides when you work al fresco. even though you'll tend to be using one main light source during daylight hours - the sun - it doesn't have to be direct sunlight to be worthwhile. In fact, while bright sunlight is great for warm summer or autumn landscapes (or any time of year - blue skies and fluffy white clouds add to most landscape shots), plus shots of the kids on holiday, and pictures of your house for Rightmove, most photographers prefer things a little more subtle for anything but landscapes. A cloudy sky is like the world's biggest natural softbox and lights detail subjects much more sympathetically. Portraits especially benefit from gentler lighting, and still life shots of flowers, leaves, nature in general do not gain anything from being too harshly lit. Portraits against an important or relevant background are easier to expose for in softer, less directional light too. In short, cloud rules for outdoor non-landscape shots. You just have to be careful not to leave the shots looking flat and lacking contrast. If options are limited and you find yourself shooting portraits in bright light, a little fill-in flash could be your friend, but I'll cover that in another post.

Time of day also makes a big difference to your final image. Sunrise and sunset light for example have completely different attributes and qualities, with sunrise being cooler and gentler as a rule, while sunset is very warm and quite directional. If you can drag yourself out of bed in time to catch a sunrise over your favourite landscape feature, the results can be well worth the effort. Just be aware that some mornings (many, if my own track record is anything to go by) don't really have a sunrise to speak of. I remember one early morning in the lake district, getting up at 5am to head to a spot I'd scoped out the previous day on the shore of Bassenthwaite Lake. I waited for the first hint of light, set up the tripod and waited. Three hours later I crawled back into bed. All that had happened was that the sky got progressively lighter grey, as unexpected cloud cover had sneaked up in the early hours. If you want to see examples of sunset vs sunrise over the same landscape, one of my favourite photography books is Charlie Waite's 'Seeing Landscapes' which has just such an example, over a rural scene in Tuscany.

And so to artificial light. Whether used in darkness or light, whether used as the main or sole light source or just to add a sparkle to an already lit scene, adding light gives you ultimate control over the presentation of your subject. First and simplest is the situation where you're lighting the scene using only light sources within your control. This applies to scenes lit with the flash on 'auto', as the camera will usually choose exposure settings which cause the flash to entirely overwhelm the ambient light, leaving the whole scene lit as if flash was the only light source, leaving shadows on otherwise well-lit surfaces behind the subject. The harsh effect of direct flash can be softened in a number of ways which I'll cover in the aforementioned later post, or you can balance it with other light sources using your flash exposure compensation setting, if you're lucky enough to have the setting and a dedicated flash (you can simulate the same-ish effect using a non-dedicated flash with auto modes). What this does is reduce the amount of light the camera will use to expose the scene, by a specified amount. The stops work in the same way as regular exposure 'stops' i.e. Minus-1 stop means the camera will use half the flash power, leaving flash to ambient at 50:50. This is a good first test point if you've determined that 100% flash is not what you need. Once you've seen the result you can adjust accordingly. If you're on film or short of review time, many mid range SLRs have flash exposure bracketing which works like regular bracketing, shooting three images with flash exposure compensation adjusting itself across the three according to a range you've specified.

So that I think will suffice as the absolute basics of lighting your scene. I'll come back to more advanced topics another time, but apart from using a flash diffuser, I rarely step beyond the bounds of what I've described above.

Have fun.

Wednesday, 9 September 2009

Decent Exposure Part 2

In an earlier post I discussed the various controls available to you for controlling how your camera exposes the scene before you. However, I didn't talk about how to read or wisely adjust what the camera tells you via its light meter, or what decisions it will be taking behind the scenes.

If you're relatively new to the whole camera thing, you're probably using scene modes or even the full auto 'green' mode present on many cameras. The level of control afforded you in these modes varies, but they all have in common that they will tell you what decisions regarding shutter and aperture they have made, but tend not to allow you to change them. Some allow ISO adjustment, some don't. I would therefore argue that one of the best ways to learn how to take pictures is to find out what the scene modes do, then make those decisions or break those rules as you learn.

I should qualify this with one quick note. The actual decisions taken by the camera are way more complicated in many cases than I'm about to suggest. My description is more of an approximation or ultimate simplification of reality. The camera will usually use a clever metering mode, compare its results against a library of saved 'standard' scenes, and choose what it considers to be the best selection of variables. You (I presume) don't have such a library, so you'll be using rules of thumb mostly instead.

Landscapes
The landscape mode will be attempting to get as much in focus as it can. It will therefore be using the smallest aperture it can get away with whilst maintaining a fast enough shutter speed to give some chance of avoiding camera shake. If auto-ISO is enabled, it may increase the sensitivity to achieve the two aims. Some compact cameras lock the focus distance on infinity in landscape mode, then rely on their relatively high depth of field to make the foreground look acceptable too.

Portrait Mode
In many ways this is the opposite of landscape mode. The camera will select a large aperture (small number) and will usually be focussing pretty close. The aim is to blur the background, thus emphasising the subject. ISO will be kept as low as possible, while maintaining hand-holdable shutter speeds. This is easier in this mode due to the wide aperture in use.

Close-Up (macro) Mode
True 'Macro' photography is defined as producing an image on the sensor which is larger than life-size. This requires specialist gear and is not what the 'close up' mode is designed for. However, the principles are the same. This mode will be expecting you to be focusing as close as you can, often using flash to add light and allow the use of small apertures to maximize the extremely shallow depth of field at close range. Shutter speed is considered to be of secondary importance although at this range, any shake at all will make the picture unusable unless the light is bright enough to allow very fast speeds. The camera will therefore play its usual game of compromise and trade some depth of field for a safer shutter speed for handholding.

Night Portrait
Usually shown as a person's outline against a night sky on the mode dial, this is a mode which allows the use of a relatively advanced feature - slow sync flash - within an easy to use 'beginners' mode. The camera will meter so as to expose the dark scene properly, as if the subject person was not present. With this part out of the way, flash will be added so as to give extra emphasis to the subject, lifting them out of the darkness of the scene as a whole. Due to the potential slow shutter speed needed, this mode may well require the use of a tripod. Think of it as landscape mode (maximising depth of field for distant scenes) combined with a blip of flash. This mode will provide the means for you to get snapshots of family or friends or whomever, in front of darkened scenes such as night cityscapes or fairgrounds. Once you move on to manually controlling your slow sync flash, you'll find it's usually quite customisable for more natural results than the 'stuck on' effect that some auto modes create.

Sport/Action
This one is all about shutter speed. The camera will do its usual compromise calculations to work out how to get the fastest possible shutter speed without making the image unusable. It will do this by opening up the aperture as wide as it can, increasing ISO in some cases etc. It will sometimes also affect the focus mode, changing it from 'one-shot' to 'servo' or 'continuous' autofocus, meaning that there is no longer any concept of locking on - the camera will be expecting you to track the action, shooting as you follow. It will therefore follow as best it can by keeping the AF moving with the subject.

DEP and A-DEP modes (canon only)
if you have a canon SLR then you may well have access to one of these modes, and sadly there's a good chance that it will be A-DEP - the less useful of the two. In this mode the camera attempts to choose an aperture and a focus distance which will render the subjects under the closest and furthest focus points (in the viewfinder) sharp within the depth of field available. DEP mode is much more useful (though still hardly an everyday staple in my experience), allowing you to individually select, using the shutter button, the closest and most distant objects you want to be sharp, then allowing you to recompose before the shot is taken.

Saturday, 4 July 2009

Not the Length of the Grass...

Yes, with a terrible piece of punnage I'd like to introduce a mini topic worthy of being thrown into the mix at this point, which is Depth of Field. Also known as Depth of Focus, this concerns what I can only really summarize as 'front-to-back' sharpness. Look in any magazine where there are both portraits and scenery shots, and the main difference you will usually see is that in the landscape shots, the whole of the scene will be sharp, from the closest sheep to the distant hills. Look at a portrait and you tend to find that the only sharp part is actually the subject, and the background is thrown out of focus, thus partly or entirely rendering it a blur.

The distance between the closest and furthest elements which are rendered 'acceptably sharp' is described as the depth of field. If you're using a digital compact or small bridge camera then your control over this effect will be limited, and can best be demonstrated when shooting as close as possible to a detailed subject, using the longest setting on the zoom lens. Some may show the effect on the LCD screen before you press the shutter, while on others you will need to compare captured images. If you're using a reasonably well specified SLR camera, whether film or digital, it's much simpler to demonstrate the effect, due mostly to the additional control available over the settings, and the 'depth of field preview' button which I personally regard as essential on any film SLR camera and highly desirable on digital SLRs. The circumstance where the resulting differences will be most noticeable will be the same scenarios as for the digi-compact i.e. close subject, long lens.

So to the demo.

Set your camera or lens to a wide aperture (small number) such as f/4 or as wide as your kit will allow, put the camera on a tripod or beanbag, focus on a nearby subject such as an ornament - something with some front-to-back depth to it. Look through the viewfinder or at the screen. You should see that only a small part of the subject is in focus. At the widest aperture, what you see is what you get. The image will record like this if you fire the shutter. Take the photo.

Now 'stop down' the lens or camera to the smallest (large number) aperture available. This may be anything from f/8 to f/32 depending on your kit. The image in the viewfinder will not change, so if you're shooting film, use of the depth of field preview at this point is your only route to check the result before your prints or slides come back, and it's well worth a look if using a DSLR too. As you press the button or lever the viewfinder will darken significantly. As your eye becomes accustomed to the reduced brightness you should be able to see that much more or all of the scene is now sharp. What the button or lever is doing is closing the lens down to the aperture you selected, allowing you to see what the film or sensor will 'see' when the shutter fires. On a well specified digital compact I would expect the LCD screen to show the result of the change, but many may not and you will have to take the photo to see the difference. The results should be obvious in these circumstances.

Which brings me back to my earlier comment, about depth of field control being limited on digital compacts. DoF is affected by three main variables. The focal length of the lens :- shorter lens = more DoF, the aperture of the lens :- smaller aperture = more DoF, and the size of the recording medium :- smaller size = shorter lenses = more DoF. On a digital compact, the sensor tends to be very small, increasing the depth of field. Due to the small sensor size, lenses tend to be very short, increasing the depth of field again, and the available aperture range is limited, thus having a further limiting effect on your level of control. These factors all conspire to make it difficult to achieve shallow DoF on many digital compacts unless you are very close, zoomed in, and using a wide aperture - using portrait mode will achieve this if your camera does not have aperture controls.

Monday, 22 June 2009

Mini Hint #1 - Caffeine

Avoid caffeine for (at least) two to three days before an important shoot. You'll be amazed by how much steadier your hands become.

Friday, 19 June 2009

Decent Exposure

Exposure is a term that's scattered liberally around any text on photography. It basically stands as a shorthand for all the settings and decisions that enable you to get an image on screen that has the brightness, colour rendition and clarity that matches the natural 'eye' view of the scene, or whatever version of that you have set out to create. Variables in question are shutter speed, aperture and film or sensor speed (ISO). I'll cover each of these in turn as they'll all be useful to you the very moment you start to see your camera as a creative tool.

Shutter speed
This is the amount of time the film or sensor (i'm going to use the term 'image plane' to refer to these two generically) is exposed to the light. Pretty obviously, longer time open equals more light hitting the image plane. Shutter speeds traditionally run on a doubling pattern, but generally the number displayed needs to be considered as a fraction. For example a speed of '1000' displayed means one-thousandth of a second, a relatively fast speed. '1' means one whole second, and inbetween we generally find 2 (half a second), 4 (quarter), 8 etc up to 64, which is then 'almost' doubled to 125, 250 etc up to whatever your camera maker deems necessary. Mine goes to 4000. Some go much faster than this, and many go to much slower speeds than 1 second. A shutter speed of 'B' signifies 'Bulb' exposure - a throwback term which basically means the shutter is held open for as long as you hold the shutter release. sometimes accompanied by a 'T' setting ('Time') which opens the shutter on one press of the release and closes it on a second, these settings can be used for very long exposures lasting several minutes or even hours when shooting star trails etc. Fast shutter speeds freeze action or movement, slow ones blur it. Different subjects will look good at different speeds. For example you may assume that a racing car should be shot at the fastest possible speed, but if that causes the wheels to be frozen too, the car will appear not to be moving. If you want to experiment with the effects of different speeds, find a fountain or fast-moving stream and shoot it at all different speeds. From swirling milky streaks to sparkling droplets, the effects are very different. Shutter speed also has an impact on flash photography. Your camera will have a maximum sync speed, above which the flash cannot be used. On most digital SLRs this is a respectably fast speed above 1/125 sec. On many (specifically Canon) budget film SLRs it was/is much lower, around 1/90 sec, though some flash units can get around this limitation.

Aperture
The Aperture setting controls the amount of light entering the lens in a different way to shutter speed, though the two are related. The aperture is the name for the hole or gap through which light passes on its way to the image plane. The diameter of this hole can be varied using either a ring around the lens barrel, or a setting on the camera body. For all Canon EOS SLRs and lenses and many of the modern budget nixon lenses, this is a camera body setting, if you're on an older camera, especially anything manual focus, the aperture tends to be set from the lens. Settings range on normal lenses from about 1.4 to 32, in numbers which increase by multiplying by approximately root2, thus the range goes 1.4, 2.0, 2.8, 4, 5.6, 8, 11, 16, 22, 32. These numbers are often referred to as 'f-numbers' or 'f-stops' and written as 'f/5.6'. This is because they are expressed as a fraction of the focal length of the lens, and thus the same number can mean the same exposure setting regardless of the lens length. F/32 is thus much smaller than F/2.0, one sixteenth the diameter in fact. The gap between each number in the range is known as a 'stop' and setting your lens to a smaller aperture is known as 'stopping down'. One stop of aperture corresponds to one doubling or halving of shutter speed, an arrangement known as the reciprocity law. If your camera suggests, for example 1/250sec at an aperture of f/11, you could equally shoot with settings of 1/60 @ f/22 or 1/1000 @ f/5.6, and obtain the same exposure, albeit with different effects. We'll come on to aperture and shutter speed related effects in a future entry. For now I'm just concentrating on exposure and as such we can leave aperture there.

ISO (or 'film') speed
This is controlled on film cameras by physically changing the film, or sometimes changing how we choose to treat film. As such it is a 'whole roll' decision that must be lived with for up to 40 frames if we don't wish to waste film. On digital cameras it tends to be much easier, and can be set differently for each and every shot if we so wish. It is a measure of the sensitivity of the recording medium, be that film or sensor. Usually available in doubling hundreds from 100 to typically 800 or 1600, it can be treated as simply another exposure variable, allowing you greater flexibility with your shots and the conditions in which you shoot them, it does have tradeoffs however, which are perhaps not so obvious as those related to shutter speed. Suppose you are set at 1/100sec @ f/4, your lens aperture as wide open as it goes, and your ISO on 400. The light levels drop and you need just one extra stop to expose correctly. Aperture is at maximum so that leaves just shutter speed or ISO. If you reduce the shutter speed (increase the time for which the image plane is exposed) then you risk not being able to hold the camera still. If you take the other option and push the ISO up to 800, your image quality may well be compromised by increased image 'grain' or 'noise' (extra patches or blotches of colour or light where you don't want them) which is a common side effect of higher ISOs. Going one stop higher to 1600 will seriously affect your image usability on all but the highest quality SLRs. It's there to be used, but bear in mind that speeds typically above about 400 ISO will adversely affect your images in some way. One quick addendum for any pedants in the building - the technically correct definition of ISO includes both the European DIN specification and the more familiar numeric American standards. The 200 or 400 or whatever is technically called the ASA rating, but in most publications etc, ISO and ASA are used interchangeably,

This has become something of a monster post, so I'll leave it there for now. Once you've digested the settings, I'll try my best to explain how and why and most importantly when to use them.